Showing posts with label Android. Show all posts

Thursday, December 17, 2015

SQLite

- Open Source database
- supports relational database features like SQL syntax, transactions
- requires limited memory (approx. 250 KByte) which makes it a light weight database to embed in to each process
- supports the data types TEXT, INTEGER and REAL

Features:
- SQLite library and thus becomes an integral part of the application program.
- Due to the server-less design, SQLite applications require less configuration than client-server databases.
 SQLite is called zero-conf.
- The SQLite file format is cross-platform. A database file written on one machine can be copied to and used
 on a different machine with a different architecture.
- Adding new tables or new columns to existing tables is so easy.
- Content can be accessed and updated using powerful SQL queries.
- SQLite read operations can be multitasked, though writes can only be performed sequentially.


Design Tips:
1. First, Second and Third normal forms in Database (Students record)
1st - Remove duplicate data and break data in granular level
2nd - All column data should depend on full primar key and not part
3rd - No column should depend on other column

( ref : https://www.youtube.com/watch?v=wp0N1tYjEWc&feature=youtu.be&hd=1)
Wednesday, October 28, 2015

Android StrictMode

TODO

What is RxJava

TO-DO

HTTP client vs HttpUrlConnection

Android provides two HTTP clients to perform network operations.

- Apache HTTP client
- HttpUrlConnection


Apache HTTP client
- Large and extensive API's
- Supports cookie handling, authentication and connection management
- Suitable for web browser and other web applications
- Does not support HttpResponseCache mechanism, hence leading to increased network usage and battery consumption

HttpURLConnection
- Light weight HTTP client
- Suitable for mobile applications
- Response caching reduce network use, improve speed and save battery.
- HttpURLConnection supported in Android from GB.
- HttpURLConnection is the best choice for Android.

Tuesday, April 14, 2015

JNI Example


#include<stdio.h>
#include<stdlib.h>
#include<errno.h>
#include<jni.h>
#include<android/log.h>
#include <android_runtime/AndroidRuntime.h>
#include <JNIHelp.h>

#include "usb-unix.h"

using namespace android;

#define LOG_TAG "GenericPrintService"
#define LOGI(...) __android_log_print(ANDROID_LOG_INFO,LOG_TAG,__VA_ARGS__)

typedef void (*update_state)(int,unsigned int);


static jobject mCallbacksObj = NULL;
static JNIEnv* Env = NULL;
static jmethodID method_reportJobState;

extern "C" int imagetops_main(int  argc,char *argv[]);
extern "C" Usb_Device_Info * getDevFile_devices();

extern "C" void update_JobState(int type, unsigned int value)
{
 jlong value_l = (jlong)(unsigned long long)value;
 
 LOGI("update_JobState type = %d, value_l = %ld",type,value_l);
 JNIEnv *env = AndroidRuntime::getJNIEnv();
 env->CallVoidMethod(mCallbacksObj, method_reportJobState, type, value_l);
}

jint Java_com_siso_app_genericprintservice_GPrintPrintingManager_InvokeIppBackend(JNIEnv* env, jobject thiz,jobjectArray stringArray){

 Env = env;
 if (!mCallbacksObj)
        mCallbacksObj = env->NewGlobalRef(thiz);
 
 jclass clazz = env->FindClass("com/siso/app/genericprintservice/GPrintPrintingManager");

 jclass glo_clazz = reinterpret_cast<jclass> (env->NewGlobalRef(clazz));
 
 method_reportJobState = env->GetMethodID(glo_clazz, "reportJobState", "(IJ)V");
  
 char *argv[100];
 int stringCount = env->GetArrayLength(stringArray);
 int i,count,lpout=0;

    for (i=0; i<stringCount; i++) {
        jstring string = (jstring) env->GetObjectArrayElement(stringArray, i);
        const char *arg = env->GetStringUTFChars(string, 0);
  argv[i] = const_cast<char *> (arg);
  LOGI("JNI InvokeIppBackend argv = %s",argv[i]);
    }
 
 lpout = ipp_main(stringCount,argv, &update_JobState, &createJavaThread);
 return lpout;


}

jobjectArray Java_com_ramesh_app_genericprintservice_GPrintPrintingManager_GetDevFileUsbDevice(JNIEnv *env, jobject thiz)
{
  Usb_Device_Info *device_info =  getDevFile_devices();
  jclass stringClazz = env->FindClass("java/lang/String");
  jobjectArray stringArray = env->NewObjectArray(3, stringClazz, NULL);

  if(device_info->device_uri != NULL)
 {
   jstring uri = env->NewStringUTF(device_info->device_uri);
   env->SetObjectArrayElement(stringArray, 0, uri);
   env->DeleteLocalRef(uri);
 } 
     
  if(device_info->make_model != NULL)
 {
   jstring model = env->NewStringUTF(device_info->make_model);
   env->SetObjectArrayElement(stringArray, 1, model);
   env->DeleteLocalRef(model);
 } 

 if(device_info->device_id != NULL)
  {
   jstring device_id = env->NewStringUTF(device_info->device_id);
   env->SetObjectArrayElement(stringArray, 2, device_id);
   env->DeleteLocalRef(device_id);
  } 
  
  return stringArray;
}

static JNINativeMethod sMethods[] = {
     /* name, signature, funcPtr */
 {"InvokeIppBackend", "([Ljava/lang/String;)I", (void *)Java_com_siso_app_genericprintservice_GPrintPrintingManager_InvokeIppBackend},
 {"GetDevFileUsbDevice", "()[Ljava/lang/String;",(void *) Java_com_ramesh_app_genericprintservice_GPrintPrintingManager_GetDevFileUsbDevice},
};


int register_android_jni_cups(JNIEnv* env)  
{ 
 jniRegisterNativeMethods(env, "com/ramesh/app/genericprintservice/GPrintPrintingManager", sMethods, NELEM(sMethods));
 
    return 0;
}

extern "C" jint JNI_OnLoad(JavaVM* vm, void* reserved)
{
    JNIEnv* env = NULL;
    jint result = -1;

    if (vm->GetEnv((void**) &env, JNI_VERSION_1_4) != JNI_OK) {
        LOGI("JNI ERROR GetEnv failed!");
        return result;
    }
    register_android_jni_cups(env);

    return JNI_VERSION_1_4;
}

package com.ramesh.app.genericprintservice;

public class GPrintPrintingManager {

    static {
        try {
            System.loadLibrary("invCupsjni");

        } catch (Exception ex) {
            Log.i("GPrintPrintingManager", "Cannot load library" + ex.toString());
        }
    }

 //Native methods
    private native String[] GetDevFileUsbDevice();
    private native int InvokeIppBackend(String[] lpCommand);

 //Callback from Native
    public void reportJobState(int type, long value) {
  
    }
 
 private void sendToUSB() {

        String dev[] = GetDevFileUsbDevice();

 }


    private int sendToIpp() {

        String[] linesArr1 = {};
        int ret = InvokeIppBackend(linesArr1);

        return ret;
    }
}

Friday, April 10, 2015

Painless threading

Main or UI thread:
- in charge of dispatching the events to the appropriate widgets & drawing event.
- ANR happens if UI thread blocked for more than 5 secs.
- the Android UI toolkit is not thread-safe and must always be manipulated on the UI thread.

ways to access the UI thread from other threads
- Activity.runOnUiThread(Runnable)
- View.post(Runnable)
- View.postDelayed(Runnable, long)
- Handler

These methods tend to make your code complicated. Android offers a new utility class, called AsyncTask, that simplifies the creation of long-running tasks that need to communicate with the user interface.

AsyncTask

 - Allows to perform background operations and publish results on the UI thread without having to manipulate threads and/or handlers.
 - Should ideally be used for short operations. (use java.util.concurrent package such as Executor, ThreadPoolExecutor and FutureTask for long running thread).
 - Define 3 generic types, called Params, Progress and Result, and 4 steps, called onPreExecute, doInBackground, onProgressUpdate and onPostExecute.
 - Async Task uses ThreadPoolExecutor to run multiple tasks at same time. total thread size = CPU Count * 2 + 1.
 - AsyncTask must be subclassed to be used. 
 - The task instance must be created on the UI thread.
 - AsyncTask callback methods are thread safe.

Generic Types.
AsyncTask<Params, Progress, Result>

params....
execute(params....)  (ex: execute(url1, url2, url3))
params are passed to doInBackground method which is being executed in worker thread

Progress....
publishProgress(Progress...) being called inside doInBackground, Progress... value passed to method onProgressUpdate running in UI Thread.

result.....
return result.... return value from doInBackground passed to onPostExecute

Cancelling a Task.
isCancelled() returns true is task been cancelled using API cancel(boolean) 

Execution.
- Before DONUT - no thread pool in AsyncTask
- After DONUT - Thread Pool introduced and by default task are executed in multiple thread.
- After HONECOMP - by default tasks are being executed in single thread to avoid error. use executeOnExecutor(Executor exec, Params... params) API to enable true parallel execution.
- AsyncTask has two static Executor instance SERIAL_EXECUTOR & THREAD_POOL_EXECUTOR

Thursday, March 26, 2015

How to save/store object in Android

Method 1: Save Object as JSON String in SharedPreference

Use GSON Library: It can be used to convert Object in to JSON representation and JSON string to equivalent object.


//To Save
SharedPreferences  mPrefs = getPreferences(MODE_PRIVATE);
Editor prefsEditor = mPrefs.edit();
Gson gson = new Gson();
String json = gson.toJson(MyObject);
prefsEditor.putString("MyObject", json);
prefsEditor.commit();

//To Retreive
Gson gson = new Gson();
String json = mPrefs.getString("MyObject", "");
MyObject obj = gson.fromJson(json, MyObject.class);

Method 2: Serializing your object to a private file

Sample Below

//Read Object from File
String devStatusPath = getApplicationContext().getFilesDir() +File.separator +DeviceStatus.class.getSimpleName();
Log.i("[ TEST ]", "ONCREATE PATH = "+devStatusPath);

File file = new File(devStatusPath);

if(file.exists()){
 mDeviceStatus = (DeviceStatus) Serialize
   .readObjectFromFile(getApplicationContext(),
     DeviceStatus.class.getSimpleName());
}

//Write to File
Serialize.witeObjectToFile(getApplicationContext(), mDeviceStatus, DeviceStatus.class.getSimpleName());

//Serialize.java

package com.android.manifesttest;
import java.io.FileInputStream;
import java.io.FileNotFoundException;
import java.io.FileOutputStream;
import java.io.IOException;
import java.io.ObjectInputStream;
import java.io.ObjectOutputStream;

import android.app.Activity;
import android.content.Context;

public class Serialize {

    public static void witeObjectToFile(Context context, Object object, String filename) {

        ObjectOutputStream objectOut = null;
        try {

            FileOutputStream fileOut = context.openFileOutput(filename, Activity.MODE_PRIVATE);
            objectOut = new ObjectOutputStream(fileOut);
            objectOut.writeObject(object);
            fileOut.getFD().sync();

        } catch (IOException e) {
            e.printStackTrace();
        } finally {
            if (objectOut != null) {
                try {
                    objectOut.close();
                } catch (IOException e) {
                }
            }
        }
    }

    public static Object readObjectFromFile(Context context, String filename) {
        ObjectInputStream objectIn = null;
        Object object = null;
        try {

            FileInputStream fileIn = context.getApplicationContext().openFileInput(filename);
            objectIn = new ObjectInputStream(fileIn);
            object = objectIn.readObject();

        } catch (FileNotFoundException e) {
            // Do nothing
        } catch (IOException e) {
            e.printStackTrace();
        } catch (ClassNotFoundException e) {
            e.printStackTrace();
        } finally {
            if (objectIn != null) {
                try {
                    objectIn.close();
                } catch (IOException e) {
                }
            }
        }
        return object;
    }
}

Monday, March 23, 2015

Customize volley default retry Policy & Cache timeout

Volley Default request retry policy:

/** The default socket timeout in milliseconds */
public static final int DEFAULT_TIMEOUT_MS = 2500;

/** The default number of retries */
public static final int DEFAULT_MAX_RETRIES = 1;

/** The default backoff multiplier */
public static final float DEFAULT_BACKOFF_MULT = 1f;


Volley does retry for you if you have specified the policy. 
Client app can change retry values for each request using below API.

setRetryPolicy(new DefaultRetryPolicy (TIMEOUT_MS, MAX_RETRIES,  BACKOFF_MULT  ));


Example Timeout - 3000 secs, Num of retry - 2, Back Off Multiplier - 2
Attempt 1: 
- time = time + (time * Back Off Multiplier );
- time = 3000 + 6000 = 9000
- Socket Timeout = time;
- Request dispatched with Socket Timeout of 9 Secs
Attempt 2: 
- time = time + (time * Back Off Multiplier );
- time = 9000 + 18000 = 27000
- Socket Timeout = time;
- Request dispatched with Socket Timeout of 27 Secs


Steps to change Volley default Cache Hit & Cache time-out values:

1. Create new Volley Request class.
2. Set custom cacheHit & cacheTimeout values in parseNetworkResponse callback method.

Please refer below example.

GsonRequest.Java

import java.io.UnsupportedEncodingException;
import java.util.Map;

import android.util.Log;

import com.android.volley.AuthFailureError;
import com.android.volley.DefaultRetryPolicy;
import com.android.volley.NetworkResponse;
import com.android.volley.ParseError;
import com.android.volley.Request;
import com.android.volley.Response;
import com.android.volley.Response.ErrorListener;
import com.android.volley.Response.Listener;
import com.android.volley.toolbox.HttpHeaderParser;
import com.google.gson.Gson;
import com.google.gson.GsonBuilder;
import com.google.gson.JsonSyntaxException;
import com.samsung.android.guardian.utils.Config;

public class GsonRequest<T> extends Request<T> {

 private static final String TAG = GsonRequest.class.getSimpleName();
 private final Gson gson;
 private final Class<T> clazz;
 private final Map<String, String> headers;
 private final Listener<T> listener;
 
 private int cacheHit;
 private int cacheExpiry;

 public GsonRequest(int method, String url, Class<T> clazz,
   Map<String, String> headers, Listener<T> listener,
   ErrorListener errorListener) {
  super(method, url, errorListener);
  
  //Using default volley retry policy
  //If retry policy has to be changed use setRetryPolicy methods from each request objects
  if(Config.VOOLEY_USE_DEFAULT_RETRY_POLICY){
  setRetryPolicy(new DefaultRetryPolicy(
    DefaultRetryPolicy.DEFAULT_TIMEOUT_MS, DefaultRetryPolicy.DEFAULT_MAX_RETRIES,
    DefaultRetryPolicy.DEFAULT_BACKOFF_MULT));
  }
  GsonBuilder gsonBuilder = new GsonBuilder();

  this.gson = gsonBuilder.create();
  this.clazz = clazz;
  this.headers = headers;
  this.listener = listener;
  
  this.cacheHit = Config.DEFAULT_CACHE_HIT;
  this.cacheExpiry = Config.DEFAULT_CACHE_EXPIRY;
 }
 

 /**
 * @param method - GET/POST/PUT/DELETE
 * @param url - server URL
 * @param clazz - class represents server response
 * @param headers
 * @param listener - listener for success case
 * @param errorListener - listener for failure case
 * @param cacheHit - time milliseconds, after this time cache will be hit, but also refreshed on background.
 *     0 for CacheHit = CacheExpiry case
 * @param cacheExpiry - time milliseconds, after this time cache entry expires completely
 */
 public GsonRequest(int method, String url, Class<T> clazz,
   Map<String, String> headers, Listener<T> listener,
   ErrorListener errorListener, int cacheHit, int cacheExpiry) {
  this(method,url, clazz, headers, listener, errorListener);
  this.cacheHit = cacheHit;
  this.cacheExpiry = cacheExpiry;
 }

 @Override
 public Map<String, String> getHeaders() throws AuthFailureError {
  return headers != null ? headers : super.getHeaders();
 }

 @Override
 protected void deliverResponse(T response) {
  listener.onResponse(response);
 }

 @Override
 protected Response<T> parseNetworkResponse(NetworkResponse response) {
  try {
   String json = new String(response.data,
     HttpHeaderParser.parseCharset(response.headers));
   Log.i(TAG,"parseNetworkResponse data "+json);

   if(Config.VOOLEY_USE_DEFAULT_CACHE_TIMEOUT){
     //Volley default Cache
    return Response.success(gson.fromJson(json, clazz),
      HttpHeaderParser.parseCacheHeaders(response));
   }else{
    // Apply custom cache
    return Response.success(gson.fromJson(json, clazz),
      HttpHeaderParser.parseIgnoreCacheHeaders(response, cacheHit, cacheExpiry));
   }
  } catch (UnsupportedEncodingException e) {
   return Response.error(new ParseError(e));
  } catch (JsonSyntaxException e) {
   return Response.error(new ParseError(e));
  }
 }
}


HttpHeaderParser.java - only new method added

    public static Cache.Entry parseIgnoreCacheHeaders(NetworkResponse response, int cacheHit, int cacheExpiry) {
        long now = System.currentTimeMillis();

        Map<String, String> headers = response.headers;

        long serverDate = 0;

        String serverEtag = null;
        String headerValue;

        headerValue = headers.get("Date");
        if (headerValue != null) {
            serverDate = parseDateAsEpoch(headerValue);
        }

        serverEtag = headers.get("ETag");
        
        final long ttl = now + cacheExpiry;
        
        final long softExpire;
        if(cacheHit > 0){
         softExpire = now + cacheHit;
        }else{
         softExpire = ttl;
        }
        
        Log.i(TAG, "parseIgnoreCacheHeaders softExpire: "+softExpire+", ttl:"+ttl);

        Cache.Entry entry = new Cache.Entry();
        entry.data = response.data;
        entry.etag = serverEtag;
        entry.softTtl = softExpire;
        entry.ttl = ttl;
        entry.serverDate = serverDate;
        entry.responseHeaders = headers;

        return entry;
    }

Google Cloud Messaging

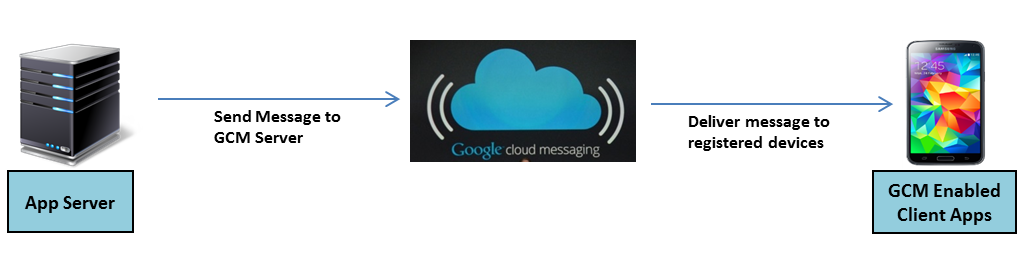
Google Cloud Messaging for Android (GCM) is a service that allows you to send data from your server to your users' Android-powered device, and also to receive messages from devices on the same connection.


Steps to follow to receive GCM notification in Android Client App

1. Write Broadcast Receiver class which extends WakefulBroadcastReceiver and handle the intent action in onReceive method

Please refer below example

Declare the components in AndroidManifest.xml

<!-- GCM Push Notification -->

<!-- Broadcast Receiver to receive the GCM notification from GCM Agent -->
<receiver
 android:name=".notification.GcmPushNotificationReceiver"
 android:permission="com.google.android.c2dm.permission.SEND" >
 <intent-filter>
  <action android:name="com.google.android.c2dm.intent.RECEIVE" />
 </intent-filter>
</receiver>

<!-- Service to handle in intent action -->
<service android:name="notification.GcmIntentService" >
</service>
<!-- GCM Push Notification -->

GcmPushNotificationReceiver.java

import android.app.Activity;
import android.content.ComponentName;
import android.content.Context;
import android.content.Intent;
import android.support.v4.content.WakefulBroadcastReceiver;
import android.util.Log;

public class GcmPushNotificationReceiver extends WakefulBroadcastReceiver {
 
 private static final String TAG = GcmIntentService.class.getSimpleName();

 @Override
 public void onReceive(Context context, Intent intent) {
  if(Debug.DEBUG_LOW) Log.i(TAG, "onReceive action = "+intent.getAction());
     // Explicitly specify that GcmMessageHandler will handle the intent.
        ComponentName comp = new ComponentName(context.getPackageName(),
          GcmIntentService.class.getName());
        
        // Start the service, keeping the device awake while it is launching.
        startWakefulService(context, (intent.setComponent(comp)));
        setResultCode(Activity.RESULT_OK);
 }
}

GcmIntentService.java

import com.google.android.gms.gcm.GoogleCloudMessaging;

import android.app.IntentService;
import android.content.Intent;
import android.os.Bundle;
import android.util.Log;


public class GcmIntentService extends IntentService {
 
 private static final String TAG = GcmIntentService.class.getSimpleName();

 public GcmIntentService(String name) {
  super(name);
 }

 @Override
 protected void onHandleIntent(Intent intent) {
        Bundle extras = intent.getExtras();
        
        GoogleCloudMessaging gcm = GoogleCloudMessaging.getInstance(this);
        // The getMessageType() intent parameter must be the intent you received
        // in your BroadcastReceiver.
        String messageType = gcm.getMessageType(intent);
        if(Debug.DEBUG_LOW) Log.i(TAG, "GcmIntentService Received : (" +messageType+")  "+extras.getString("title"));
        
        GcmPushNotificationReceiver.completeWakefulIntent(intent);
 }

}

Thursday, March 19, 2015

Android Runtime (ART) Feature

Android Runtime (ART) Feature

1. Ahead-of-time compilation
- At install time, ART compiles apps using the on-device dex2oat tool.

Instead of being JIT, AOT compiles application code (byte) and generates native code in ELF File. Subsequent execution happens from compiled native code (that is ELF)
ELF - Executable and Linkable Format.

2. Improved garbage collection
- One GC pause instead of two


Monday, March 16, 2015

Tasks and Back Stack

Tasks and Back Stack

- Task is a collection of activities that users interact with when performing a certain job.
- The activities are arranged in a stack (the back stack), in the order in which each activity is opened.

- When the user touches an icon in the application launcher that application's task comes to the foreground. 
 If no task exists for the application (the application has not been used recently), then a new task is created 
 and the "main" activity for that application opens as the root activity in the stack.
 
- When new activity is started, it's pushed in to back stack. The previous activity stopped and system retains it current 
 user interface state. When user presses back key , activity which is in top of back stack is popped and destroyed by system
 and previous activity just resumes its state. 
 
 
Managing Tasks: Application allows users to start a particular activity from more than one activity, a new instance of that activity is created and pushed 
                onto the stack . one activity in your application might be instantiated multiple times. you can modify this behaviour if you do not want an 
activity to be instantiated more than once using below methods.

launchMode: 
- "standard"
- "singleTop"
- "singleTask"
- "singleInstance"

Using Intent flags

- FLAG_ACTIVITY_NEW_TASK
- FLAG_ACTIVITY_SINGLE_TOP
- FLAG_ACTIVITY_CLEAR_TOP

Clearing the back stack: If the user leaves a task for a long time, the system clears the task of all activities except the root activity. 
When the user returns to the task again, only the root activity is restored. 

- alwaysRetainTaskState: retains all activities in its stack even after a long period, if this attribute is set to "true" in the root activity of a task.
- clearTaskOnLaunch: The user always returns to the task in its initial state, even after a leaving the task for only a moment.
- finishOnTaskLaunch: This attribute is like clearTaskOnLaunch, but it operates on a single activity, not an entire task.

Intent & Intent-Filters

Intent & Intent-Filters

Intent

- Messaging Object
- Can be used to request an action from another component.
- Facilitate communication between components in several ways.

use-cases
1. Start an activity.
2. Start a service.
3. Deliver a broadcast.

Intent Types

- Explicit intents: Specify the name by component class name. Can be used only to start a component in your own app.

- Implicit intents: Specify the general action to be performed, which allows component from other app to handle it.
If the action is compatible with multiple components, the system displays dialog.


Note: Beginning with Android 5.0 (API level 21), the system throws an exception if you call bindService() with an implicit intent.


Building an Intent
- Intent object carries information that the Android system uses to determine which component to start.

1. Component Name: Name of the component, Optional for implicit intent but critical for explicit intent.
2. Action Name : Specifies the generic action to perform.
3. Data: The URI (a Uri object) that references the data to be acted on and/or the MIME type of that data
4. Category: Additional information about the kind of component that should handle the intent
5. Extras: Key-value pairs that carry additional information required to accomplish the requested action.
6. Flag: flags instruct the Android system how to launch an activity.

Receiving an Implicit Intent
- Declare intent filters for each of your app components with an <intent-filter> element in your manifest file.
- Each intent filter specifies the intent's action, data, and category.
- The system will deliver an implicit intent to your app component only if the intent can pass through one of your intent filters.

Note: In order to receive implicit intents, you must include the CATEGORY_DEFAULT category in the intent filter.  
 Android automatically applies the the CATEGORY_DEFAULT category to all implicit intents passed to startActivity() and startActivityForResult().


Using a Pending Intent
- PendingIntent object is a wrapper around an Intent object.
- Grants permission to other application use the contained Intent as it is executed from your own app process.

Use Case: Notification Manager, Alarm Manager and App Widget executes the intent in app process.

Intent Resolution
- TBU